Meat Sticks Recipe: How to Make Homemade Venison or Beef Sticks
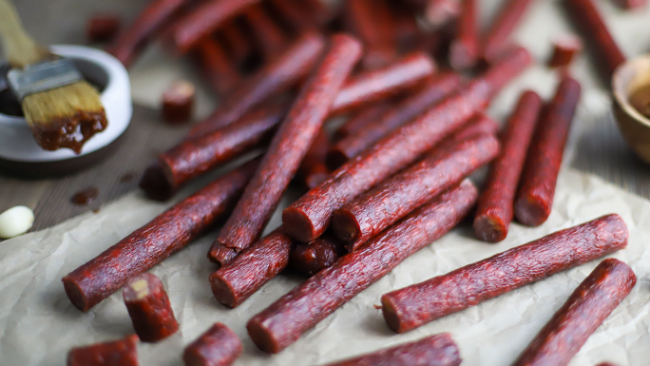
Meat sticks, snack sticks, beef sticks, slim jims, whatever you want to call them, these on-the-go meat snacks are a staple in sausage making. A cousin of jerky, this semi-dry sausage is thinner in diameter and can be made from pork, beef, venison or other combinations of wild game.
Meat sticks are ground then stuffed in either collagen or natural casings. They can be seasoned with virtually any profile and enhanced with add-ins like high-temp cheese, encapsulated citric acid or cultures. No matter how you flavor your meat sticks, they're the perfect hand-held meat snack and are a great way to utilize your venison or leftover trimmings.
Tools of the Trade
- Meat Grinder with 3/8” and 3/16” plates
- Meat Mixer or Your Hands
- Meat Lug or Large Food-Safe Container
- Stuffer (13 or 16mm horn)
- Smokehouse
Meat (and Fat) Instructions for Meat Sticks
For this venison snack stick recipe, making sure you have the right meat-to-fat ratio is important. For the best meat sticks, you'll want to shoot for a range of 15-25% fat and 85-75% lean for the finished product. Any leaner, and you risk a dry and crumbly texture in your snack sticks. This is especially important when making deer sticks. When working with venison, we recommend adding about 50% venison and 50% pork trim with 50% fat content into your snack sticks. Pork trim, or the trimmings from the shoulder or butt, are typically available at your local butcher shop (make sure to call ahead!). If you want to be really precise, you can separate the visible fat from the meat and weigh them out separately to get the exact ratios right for your venison sticks.
Grinding & Mixing for Snack Sticks
Meat sticks don't require a very fine grind, as you'll want to retain some visual separation of fat and meat in your final beef sticks. To get the right snack stick texture, we recommend grinding twice; the first pass through a 3/8“ plate then twice through a 3/16” plate.
Pro tip: Remember to always keep your sausage stick's meat cold! We recommend popping your meat block back into the cooler between grinds to prevent smearing.
Once each of your proteins has been ground, you can begin mixing either by hand or by using a meat mixer. We recommend doing it by hand for batches less than 25 lbs as you don't want to break the any encapsulated citric acid or high-temp cheese you're adding into your snack sticks.
Beef Sticks Seasoning & Additives
Begin by adding your seasoning to your meat sticks. Whether you're making pork, venison, beef sticks, we recommend our No. 765 Honey BBQ Snack Stick Seasoning or No 769 Willie's Seasoning. Both have a great depth of flavor that are equally good on their own or mixed with other additives like high-temp cheese. Other favorite meat stick seasonings are:
- No. 769 Honey Sriracha Seasoning: Sweet with just the right amount of heat. Comes with Speed Cure. Perfect for beef sticks.
- No 491 Seven Pepper Seasoning: Feel the burn! This blend is just like the name implies with chili, jalapeno, chipotle, habanero and red peppers. Comes with Speed Cure. Amazing for venison sticks.
- No. 798 Pepperoni Stick Seasoning: The delicious taste of pepperoni in a snack form. Comes with Maple Cure. Best for pork sticks.
If your seasoning doesn't have any larger pieces, you can season after the first grind and have the grinder do some of the distribution for you.
All of our meat stick seasonings come complete with cure for up to 25 lbs. of meat. Nitrites help preserve the red in the meat in the absence of oxygen and also kill bacteria that can result in food-borne illnesses. Add the appropriate amount of cure for your meat batch to your water and stir to combine.
Once the seasonings and cure have been well incorporated into your meat stick mix, this is the time to add in any other flavorings. We like to add in high-temp cheddar cheese and encapsulated citric acid. Encapsulated citric acid gives a mouthwatering tang to your finished sausage sticks and because it's coated, won't break down the texture of the meat.
For meat snack sticks, you'll want to get a good amount of protein extraction before stuffing. The end results should be sticky and pasty, with seasonings well incorporated throughout. For proper jerky stick flavor and color development, refrigerate your meat mixture overnight or for several hours before stuffing.
Meat Sticks Casings
Meat sticks have a smaller diameter and are typically made with either natural sheep casings or small collagen casings. We prefer the irresistible “snap” that comes from natural sheep casings, but collagen casings will offer better uniformity and rich mahogany color for your snack sticks. For the best beef sticks, we recommend:

Meat Sticks Processing
One of the trickiest parts of making meat sticks is the processing or smoking process. If the sausages heat too quickly, the fat has the potential of melting out of the beef stick and the encapsulated acid can break down. The key is to gradually increase the temperature to ensure there's no fat or additive loss inside the snack sticks.
The type of combustible you will use for smoking also has an impact on the taste and smoking process of your meat sticks. It is best to do some research and figure out which material you should use to obtain the best beef sticks.
To make the best smoked snack sticks, we recommend using a high quality electric smokehouse, like the Pro Smoker PK-100, which uses sawdust as smoke fuel. Always refer to your manufacturers instructions for smoking times and temperatures, but as a general rule, our recommend processing schedule is:
- Set smokehouse to 120° F. Hung sausage sticks and set in the smokehouse to dry for ½ hour (no smoke)
- Increase temperature to 130° F and smoke for 1 hour (dampers closed 75%)
- Increase temperature to 150° F and smoke for 1 hour
- Increase temperature to 170° F and remove smoke
- Cook until internal temperature of the snack stick reaches 155° F degrees
Cooling
There are two ways to cool down sausages and snack sticks after the smoking process: air drying or ice bath. If you choose to air dry, let the meat sticks rest at room temperature for about ½ hour to bring the internal temperature of the snack sticks down to 110 degrees before placing them in the fridge to cool completely. The ice bath method goes faster, but both processes with get the casings to firm up and create the nice snap texture when you bite into your beef sticks.
Once in the fridge, wait until the snack sticks reach an internal temperature of 39 degrees before vacuum packing or storing. If properly sealed and packaged, snack sticks can last in the freezer for several months or in the refrigerator for 2-3 weeks.
Enjoy Your Homemade Beef Sticks!
You now have succeeded in making your own homemade meat sticks! Whether you chose to follow it as a venison or beef sticks recipe, we are sure you will feel proud every time you go for a quick meat snack!
Don't hesitate to check out all our sausage recipes and meat & sausage tips!
For printable instructions, see our recipe for Honey BBQ Venison Snack Sticks.